Whether you are editing a photo or playing with all the fancy effects in Photoshop, you must know how to zoom in and out on Photoshop. Knowing how to zoom in/out of an image inside Photoshop not only help you in making precise pixel-level adjustments but also give you a bird’s eye view of your work.
Photoshop gives you multiple ways to zoom in and out of your document. In this article, We will get you through all the methods you can use to zoom in and out of a Photoshop document.
How to Zoom in and Out on Photoshop?
Method 1: Using Keyboard Shortcuts
One of the easiest and fastest ways to zoom in and out on Adobe Photoshop is using Keyboard shortcuts. There is a saying; that if you want to master any software, you should learn its keyboard shortcut first.
With that said, let’s see how you can zoom in and out on Photoshop using Keyboard shortcuts.
With your image open inside Photoshop, press and hold the Ctrl key and press the + key to zoom in. If you want to Zoom in further, you just have to press the + (Plus) Key multiple times while holding the Ctrl Key.
Similarly, for Zooming out press the Ctrl key with the – (Minus) Key.
While on the Mac, you have to press the Cmd key with the + (Plus) key to zoom in. And Cmd key with – (Minus) Key to zoom out.
Quickly Zoom back to 100% in Photoshop
Suppose you want to see how your document will look in its original size. You will have to zoom in to 100% to get its most accurate view.
The quickest way to zoom back to 100% is using the keyboard shortcut; Ctrl + 1 on Windows. (or Cmd + 1 on the Mac)
Method 2: Using Mouse Scroll Wheel
This is the method I use for zooming in and out of an image inside Photoshop. Since my workflow involves using Photoshop with a mouse, I am more comfortable using the mouse wheel to zoom in and out.
By default, you can zoom in/out of a Photoshop document by scrolling the mouse wheel while pressing the Alt key on Windows and the Option key on Mac. Scrolling up will Zoom in while scrolling down will Zoom out.
Enable zoom with the scroll wheel in Photoshop!
There is also an option to quickly zoom in/out using the mouse scroll wheel without pressing any key on your Keyboard.
- Inside Photoshop, Press Ctrl / Cmd + K to open Photoshop Preferences.
- Now click on the Tools option, and there check the “Zoom with Scroll Wheel” option to enable zoom with the scroll wheel in Photoshop.

- You can now quickly zoom in and out of an image inside Photoshop by spinning your mouse wheel directly.
Note that enabling this option will disable the default scroll wheel behaviors. You will be able to zoom in and out on scroll but can not scroll the document the usual way. You’ll have to use the scroll bars to do the same action.
Method 3: Using Zoom Tool inside Photoshop
Other than using the Keyboard shortcuts and mouse scroll wheel, Adobe Photoshop has a dedicated Zoom tool that you can use to zoom in and out.
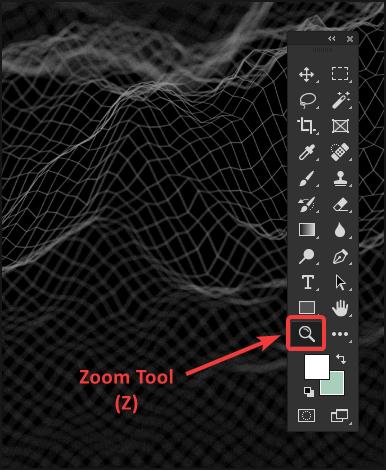
To access the Zoom tool, click on the Magnifying Glass icon at the bottom of the toolbar on the left side of your Photoshop window. Alternatively, you can also press the Z key on your Keyboard to quickly access the Zoom tool.

While the Zoom Tool is selected, your cursor will look like a magnifying glass with a plus sign. Here, the Plus sign indicates “Zoom in,” while the Minus sign means “Zoom out.”
Now bring the cursor over the image and zoom in by clicking on the part you want to magnify. You can zoom in further by clicking multiple times on your image.
Press and hold the Alt/Option key while clicking on the image if you want to Zoom out. Pressing the Alt/Option key will change the sign inside the magnifying glass to minus, allowing you to zoom out of your image.
And that’s how you use Zoom Tool to zoom in (and out).
Zooming in and out using the Navigator tool inside Photoshop is a bit tricky. But it can be handy if you are working on a large-sized image document and want to zoom in to a specific area. It is a combination of Zoom Tool and Move Tool that lets you control the zoom without losing sight of the document you are working on.
You will most likely find the Navigator tool (icon that look like a Ship’s Steering Wheel) on the right side alongside other tools. If it is not there, you can enable it from the “Window” menu on the Menu bar. (Window > Navigator)

On the Navigator Tool, you’ll see your whole document with a zoom slider at the bottom. Dragging the Zoom slider towards the right will Zoom in while dragging it to left will zoom out. You can also see the zoom percentage on the right side of the zoom slider.

One great thing about Zooming using the Navigator Tool is that when you zoom in, you can see the zoomed area highlighted inside the tool panel. And you can also move it around from the panel itself.
Wrapping up: Zoom in and out on Photoshop!
And that’s how you Zoom your way around in Photoshop. Isn’t it fascinating to know that there are multiple ways to zoom in on this photo editing and manipulation app, and each method has its perks? Let us know which is your favorite way to zoom in/out in Photoshop!