If you feel the audio experience on your Windows PC is a bit underwhelming or lacks the punch when you play music on it. It is high time you change these audio settings on your Windows PC to get the best sound quality out of your speakers. Changing these settings will vastly improve the sound quality of Windows speakers.
Whether you are using Windows 10 or 11, these settings will improve the overall sound quality of your computer or laptop’s speakers.
If you are using multiple audio devices, you might have to enable these settings for all those one-by-one.
This article will cover all the tweaks you should enable to enhance the sound quality of your laptop’s speakers.
Enable Audio Enhancement.
Both Windows 10 and Windows 11 have built-in audio enhancement features that enable you to get the best possible audio experience. Enabling the Audio Enhancement feature is the easiest way to fine-tune your windows sound quality.
You can enable or disable audio enhancements by following the steps below on both Windows 10 and Windows 11.
- Go to Start and open the “Settings” app on your computer. You can also press the “Win + I” keyboard shortcut to open the settings app directly.
- Inside the Settings window, open “Sound.”
- Now click on “Speakers” inside the “Output” section.
- Scroll down and change “Audio Enhancement” to “Device Default Effects” to enable Audio Enhancements on your Windows PC, and you are done.
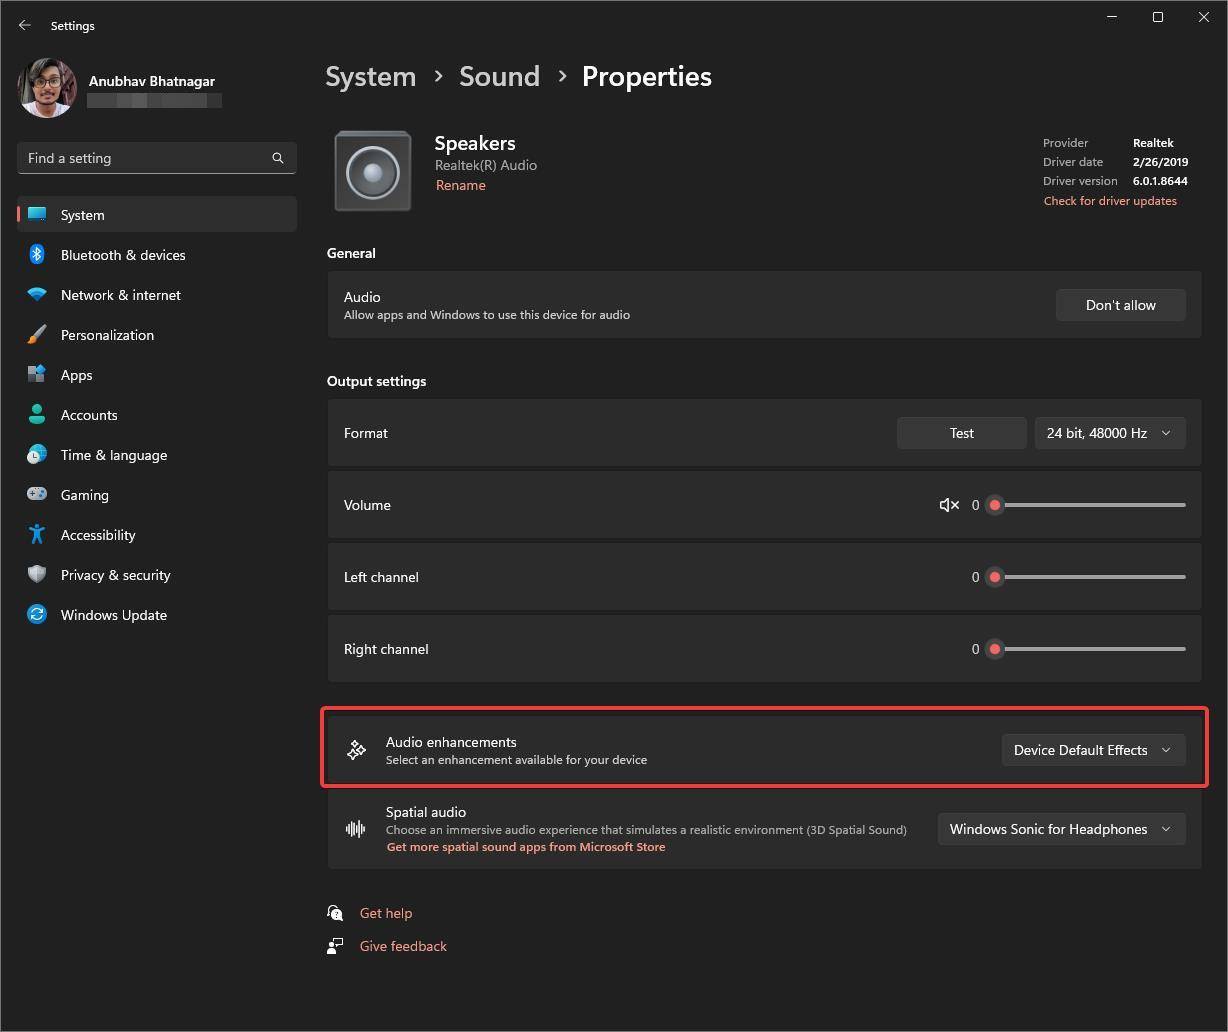
Now try playing music on your computer and see how much of a difference this tweak makes to your overall audio experience. In our testing, doing this alone drastically improved the sound quality on our Windows PC.
Also read: Best Screen Dimmer Apps for Windows 10/11!
Enable Spatial Audio.
Enabling Spatial Audio will add virtual surround sound effects to your audio listening experience. If you usually watch movies or play games on your computer, you can enable Windows Sonic for Headphones to create an immersive 3D audio experience.
For Spatial Audio to work, you’ll need to enable “Audio Enhancements” first; otherwise, you won’t hear a difference.
To enable Spatial Audio on your Windows 11/10 PC, follow the steps below.
- Go to Start, open the “Settings” app. (or press the “Win + I” shortcut key)
- Inside the Settings app, open “Sound” and then click on “Speakers” inside the “Output” section.
- Scroll down and change Spatial audio to “Windows Sonic for Headphones.”
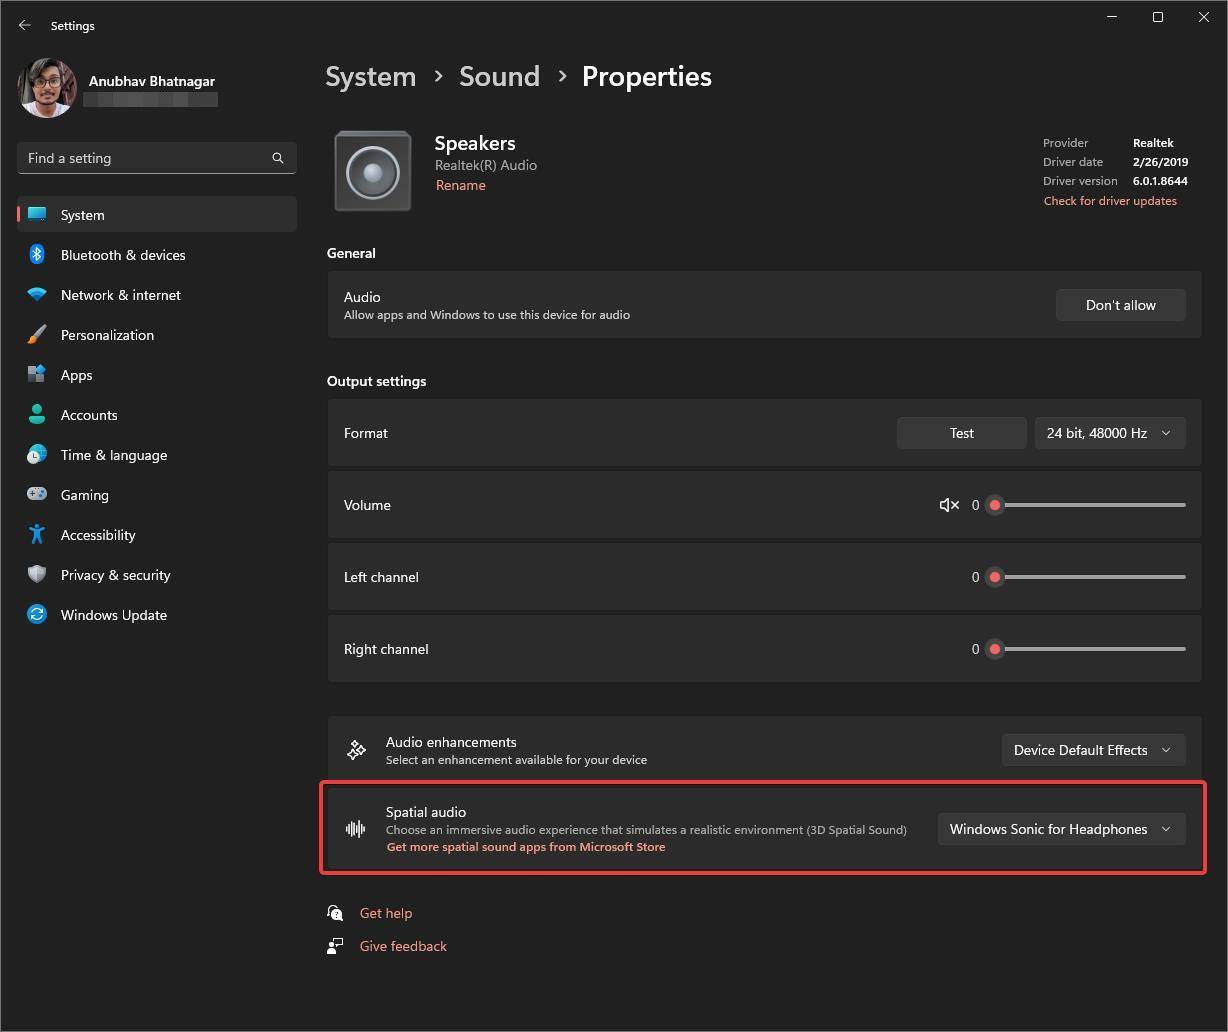
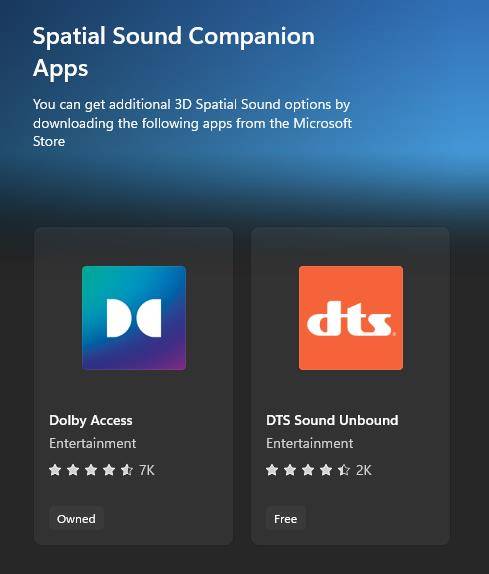
If “Windows Sonic for Headphones” doesn’t do justice to you, you can also try the paid alternatives like Dolby Access or DTS Sound Unbound from the Microsoft Store.
Increase sample rate and audio bit depth.
Another way you can get the most out of your Windows audio experience is by bumping up the audio quality by changing the sample rate and audio bit depth inside Windows Settings.
Both Windows 10 and Windows 11 support changing the sample rate, as well as audio bit depth. By default, both Windows operating systems are configured to use a lower-quality sample rate, which you can easily change from the settings.
Here is how to change the sample rate and audio bit depth inside Windows 10 and Windows 11.
- Go to Start and open the “Settings” app on your computer. You can also press the “Win + I” keyboard shortcut to open the settings app directly.
- Inside the Settings window, open “Sound.”
- Then click on “Speakers” inside the “Output” section to open your speaker’s properties.
- Now look for the drop-down menu next to the “Format” option, change it to the highest possible quality, and click on the “Test” button to hear the audio sample with the selected sample rate.

Selecting a higher-quality sample rate and bit depth can significantly impact the audio coming out of your speakers. This tweak works best if you have paired your Windows PC with some high-end speakers/headphones, with a sensitive driver for a dynamic and detailed music-listening experience.
Enable Bass Boost and add extra bass to your speaker.
Windows 10 and 11 also come with a built-in Bass Boost feature that enables you to add some extra thump to your speakers. This is great if you want to add extra oomph to your music-listening experience.
One thing to note is that the Bass Boost option isn’t available to all Windows PCs. Only if you have supported hardware, you’ll see the Bass Boos option on your windows computer.
Here is how you can enable Bass Boost on Windows 10 and Windows 11. Just follow the steps mentioned below.
- Hit “Win + R” to open the run window on your Windows System.
- Then type “mmsys.cpl” and hit enter to open legacy “Sound” settings.

- On the “Playback” tab, double-click on your default speaker to open its property window.
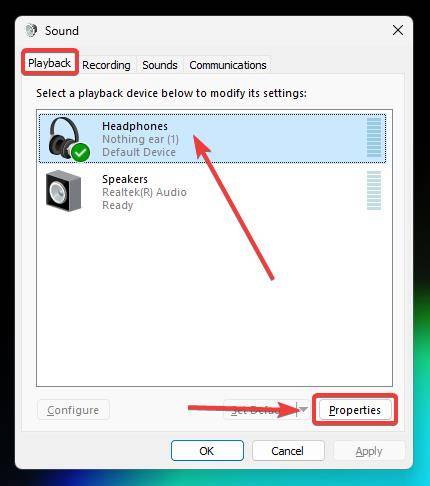
- Now click on the “Enhancements” tab and check the “Bass Boost,” and then hit “OK” to save your settings.

Now play bass-heavy music to experience the thump you were missing on your computer.
If you are unhappy with the results or want to tweak more, you can change the bass frequency and boost level from the Bass Boost settings. The default is set to 80 Hz/6 dB.
I found 75 Hz/8 dB the sweet spot for some extra oomph over the default bass setting for my speakers. But don’t touch these settings unless you know what you are doing at the expense of your speakers.
Update your Audio Driver to improve sound quality on Windows.
Lastly, keeping your Windows audio driver up to date is the most important thing you can do to improve Sound Quality on your Windows 10/11 PC.
If you are using outdated audio drivers, you may be unable to take advantage of features like Audio enhancement and 3D spatial audio. The manufacturer also fixes audio-related issues time-to-time; timely updates to drivers will solve audio issues related to an old driver.
For most parts, Windows automatically handles updating drivers through Windows updates. You can also manually update your Windows Audio drive through Device Manager. Here is how.
- Hit “Win + R” to open the run window on your Windows System.
- Then type “devmgmt.msc” and press enter to open Device Manager.

- Inside the Device manager windows, look for your audio device under “Sound, video, and game controller.”
- Right-click on it and choose “Update Drive.”

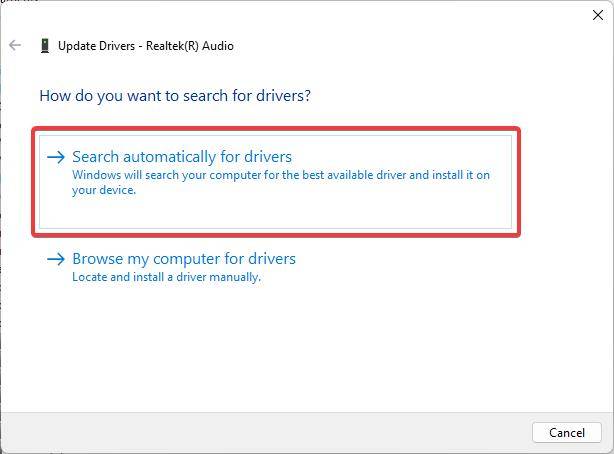
- On the Update Drivers window, select “Search automatically for drivers” and let the device manager search for the latest available audio driver and install it automatically on your computer.
But, if nothing works, the last option to update your Windows audio driver is directly through the device manufacturer’s website.
First, identify your audio device model; visit the Manufacturer’s website to download the latest Windows audio driver file for your device. After downloading, open the file and install the latest driver on your Windows computer.
Improve Sound Quality on Windows – Final words!
These tips will improve the sound quality of your Windows Laptop/PC to a great extent. But if none of the settings mentioned above enhances the audio quality on your computer, you should consider third-party options like Equalizer APO or FX Sound.
These sound enhancer apps are improved sound drivers compatible with Windows 10, Windows 7, and Windows 8. Using these third-party equalizer apps, you can significantly improve the sound quality of your Windows PC.