As a power windows user, I keep looking for new utility tools to customize and enhance my Windows experience. And the one tool that sticks out to me as the ultimate swiss army knife tool for Windows is Microsoft PowerToys.
Microsoft PowerToys goes back to Windows 95 when Microsoft first released this utility with 15 tools to tweak Windows, which would otherwise require users to mess around with registry settings. The current version of PowerToys is similar and offers a variety of nifty tools to provide an enhanced Windows experience keeping productivity in mind. You can use all the tools or toggle on those you need in your current workflow.
But before seeing what you can do with each PowerToys tool, let’s see how you can download and install Microsoft PowerToys on your Windows computer.
How to Download and install Microsoft PowerToys on Windows?
You can download and install Microsoft PowerToys directly from the Microsoft Store or grab the installer from its Github Repository and install it on your windows computer.
Note that you can only install Microsoft PowerToys on Windows 10 v2004 and Windows 11, running on x64 or ARM64-based processors.
So, if you are going with the Github option, choose the right installer based on your processor’s architecture for an error-free installation. Otherwise, install it directly from the Microsoft Store to avoid any confusion.
How to set up and use Microsoft PowerToys?
Setting up Microsoft PowerToys on your Windows 10/11 PC is very simple. After installing it on your computer, open the “Microsoft PowerToy (Preview)” app from your Windows app list.
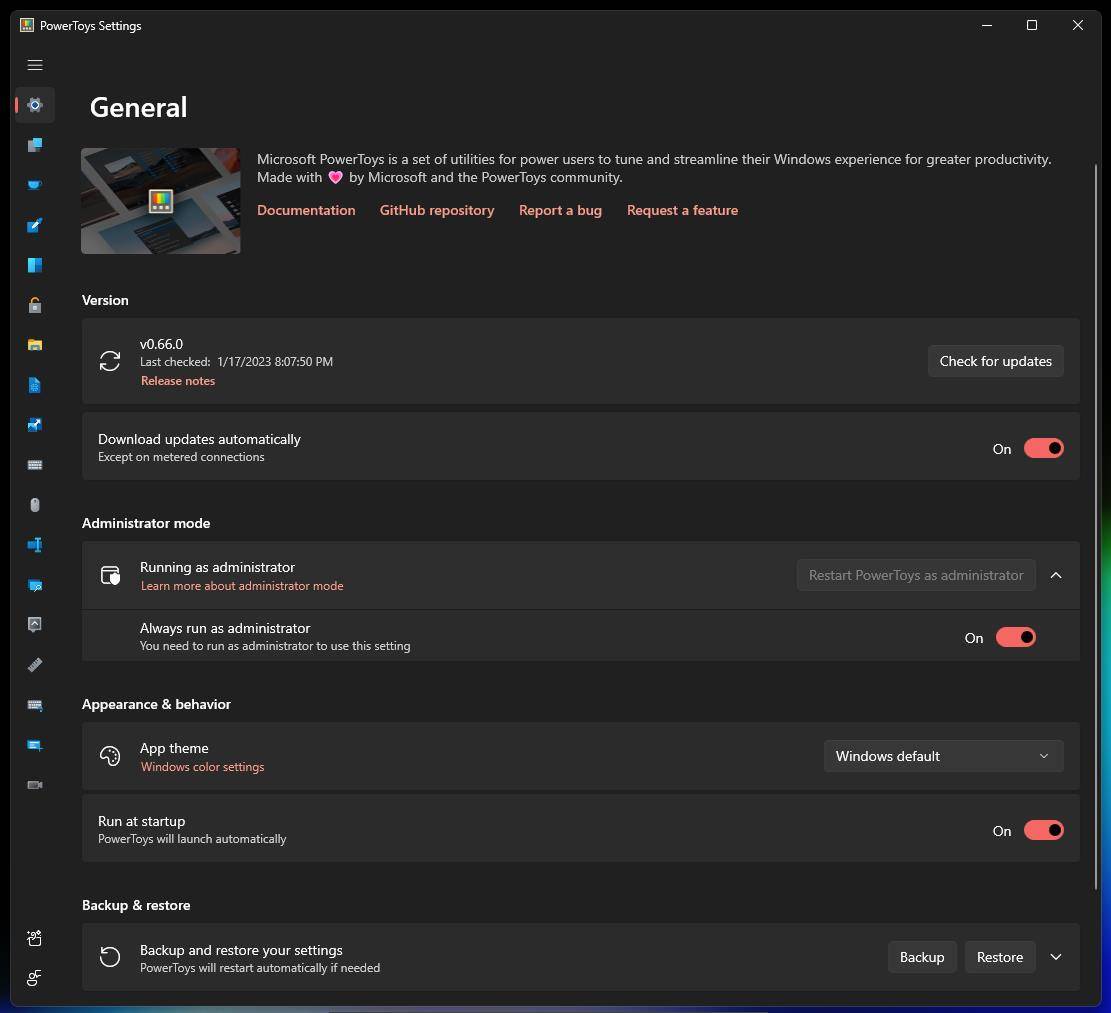
On the app home screen, you can see its version and check for new updates for the app by pressing the “Check for updates” button. If an update is available, you will see the option to download and install it. I suggest you turn on the “Download updates automatically” option so that PowerToys can send you an update notification whenever the new version is released.
The next thing you will see is the “Administrator mode” section. Running PowerToys as administrator is recommended, as some tools like FancyZone and Keyboard Remapper require administrative permissions. For that, turn the “Always run as administrator” toggle on, and then hit the “Restart as administrator” button to ensure that PowerToys will always run as administrator on your windows computer.
Below that, under the “Appearance & Behaviour” section, set the app color theme based on your preference. Then turn on the “Run at startup” toggle to allow PowerToys to run automatically during Windows startup.
Lastly, we have the option to Backup or Restore PowerToys settings. Here you can backup or restore the settings of various PowerToys tools that you will be configuring in the next section.
You have successfully installed and setup Microsoft PowerToys on your Windows 10/11 PC. Now all you need to do is enable the tools you’d like to use. You can do that by selecting the said tool from the sidebar and pressing the toggle to on to enable it, and customize it further if needed.

Next, let’s discuss all the PowerToys tools that you can use to customize and enhance your Windows experience.
All the Microsoft PowerToys tools and utilities explained!
Microsoft PowerToys comes with useful tools that allow you to customize and enhance your Windows experience significantly. The latest version of PowerToys currently comes with more than 10 tools. Let’s go through them individually and see what each tool can do for you.
Always On Top tool
The Always On Top tool allows you to pin any app window on top of all the windows. So, no matter what other window you open, the pinned window will always stay above them. You can use this tool when you want to keep an eye on certain app all the time.

Want to pin a certain app window on top? Move that app window where you want to pin it and press the “⊞ Win + Ctrl + T” shortcut on your keyboard. The pinned app window will have a border around it and play a sound as soon as you press the keyboard shortcut. You can disable both the border and the sound effect or even change the border’s thickness or color as per your preference inside the PowerToys app.

To unpin that app window, press the keyboard shortcut again, and you are done.
Awake tool
Windows OS is designed to save power by putting your computer in a sleep state after a certain period when not in use. But if, for some reason, you want to keep your computer running, you can use the Awake tool of Microsoft PowerToys.
Using the Awake tool, you can not only stop your computer from going into a sleep state but also keep your computer’s screen/display on. And this works on multi-monitor setups as well.

The tool has three modes, the first mode will keep the default state of your power plan, the second mode will keep it awake indefinitely, and the third mode with keep it awake temporarily.
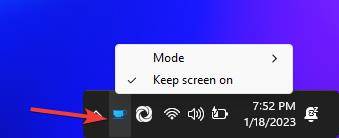
When the Awake tool is enabled, you can manage and change different modes right from the taskbar inside the system tray.
Color Picker tool
The Color Picker tool is a godsend if you are a designer or a developer. This system-wide color picker tool allows you to easily grab/pick a color from anything on your computer’s display.

Simply press “⊞ Win + Shift + C,” then move your cursor to the color you want to pick and click on it. This tool will work on any app or window on your computer.

When you pick a color, it will default open the editor window with some color formats. You can change this behavior to pick the color in your default color format and even show the color name when you hover your mouse over the screen after pressing the keyboard activation shortcut.
Color Picker tool supports various color formats like HEX, RGB, HSL, CMYK, etc. And even allow you to add your color format if it’s unavailable in the list.
FancyZones tool
Even though Windows snapping tool is robust in its current state, it still has some limitations. And that’s where the FancyZone tool comes in. It is just like Windows’ Snapping tool but on steroids.
FancyZones tool offers a lot of customizations over the default windows snapping. You can create custom windows layouts, change their snapping behavior, and even override the default Windows Snap.
But a wide or multi-monitor setup is where it shines the most. You can create custom layouts for each display and organize your applications’ windows, which is impossible through Windows Snap.
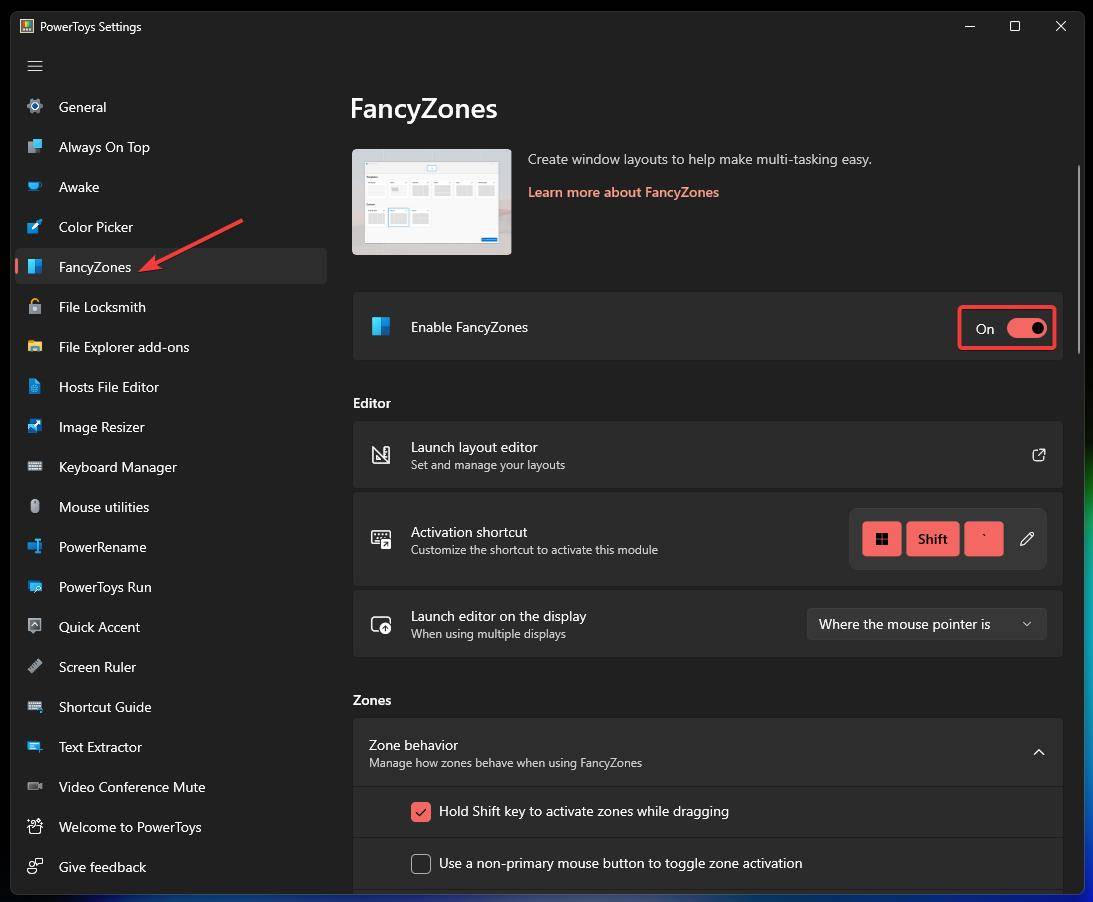
To enable FancyZones, open the FancyZone section in the PowerToys app and toggle it on. After that, launch Layout Editor and choose your preferred layout from the templates. Or create your layout by clicking on the “Create new layout” button and saving it.

Now you have to press “Shift” while dragging any window to activate FancyZone and drop the app window in one of the zones. Repeat it until all your app windows are in their respective zone.
File Locksmith tool
Ever got into a situation where you are trying to open/move/delete a file or folder, but Windows is preventing you from doing that? The File Locksmith tool is your savior.
Using the File Locksmith tool, you can not only find what process is using that file/folder but also give you the option to end it within the window.
After you enable the File Locksmith tool inside Microsoft PowerToys, right-click on the file/folder and select the “What’s using this file?” option. (In Windows 11, right-click on the file, then select “Show more options,” and after that, select the “What’s using this file?” option.)

File Locksmith window will open with the list of processes using that file. Simply press the “End Task” button to end that process and try opening/deleting the file again. You should now be able to perform the same action without errors.
File Explorer Add-on tool
Windows Explorer has a Preview Pane, which you can enable by pressing the “Alt + P” keyboard shortcut. This Preview Pane lets you preview certain file formats without opening them in their respective apps/programs. But, by default, the preview support is limited to images, PDFs, and text file formats.
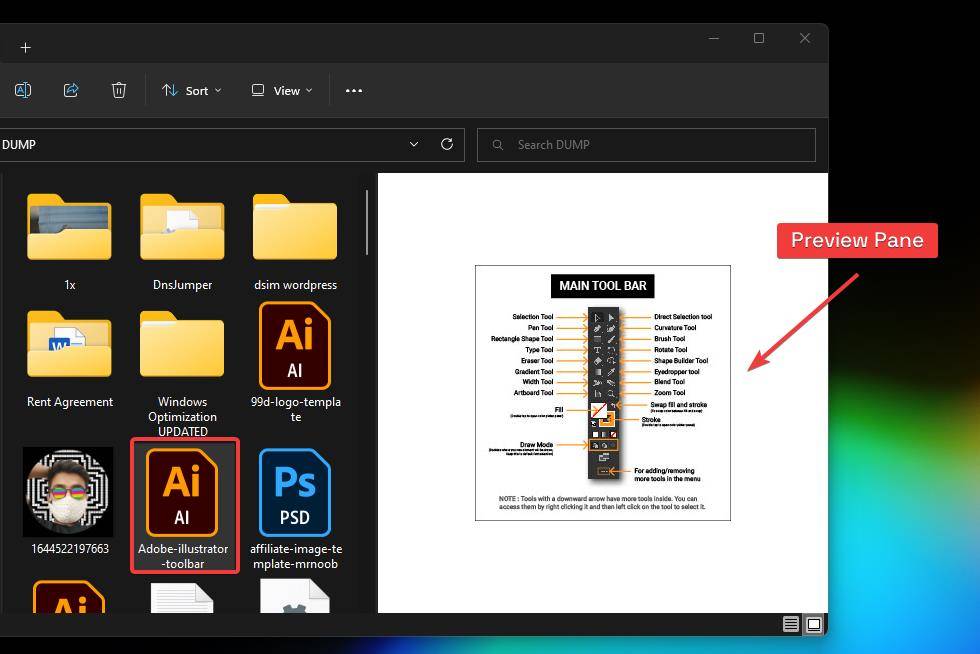
With the File Explorer Add-on tool, you can manage a custom preview handler on your Windows File Explorer and allow more file types to render inside the Preview Pane. Currently, you can enable preview pane support for .svg, markdown, source code, and .gcode file format.

In comparison, the custom preview list is less extensive than what we get on Mac OS, where you can preview the file by pressing and holding the Spacebar key. It’s a good start, and being a designer, I appreciate SVG preview, while developers out there will appreciate Markdown preview support.
More so, you can also enable thumbnail preview for these formats for the files icons to preview the content inside them as its thumbnail.
![]()
To enable this, open File Explorer Add-on settings inside Microsoft PowerToys and toggle on all the formats that you want to render inside the preview pane, and preview on the thumbnail icon. You should restart your computer for Thumbnail Icon to start showing a preview of its content.
Hosts File Editor tool
You know how unintuitive it is if you have tried editing your computer’s host files. Finding the host file inside your file explorer to edit it is a task. Hosts File Editor tool simplifies the process of editing your Windows Hosts file, allowing users to easily map IP addresses to their hostnames in a GUI.
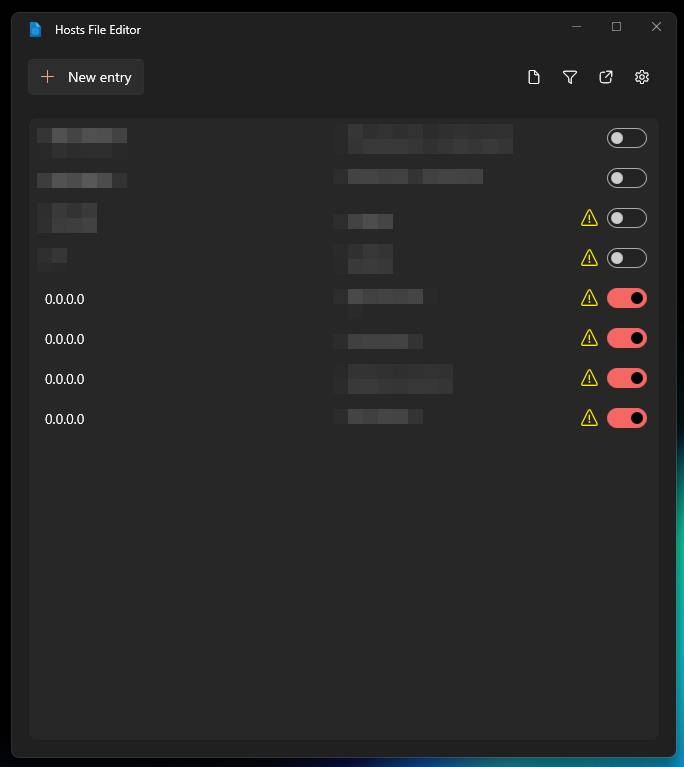
You can enable the Hosts File Editor inside PowerToys and launch it to add a new host or manage the one already listed.
Image Resizer Tool
Suppose you want to resize an image on your windows computer; what are your options? Open that image in a photo editor app and resize it, then save the resized image on your computer. Or, using some online tool, upload your image to their servers and download it on your computer after resizing.
Well, that’s too much of a hassle for a simple task. What if I tell you that you can do the same with a couple of mouse clicks?
That’s where Image Resizer comes into action. This PowerToy tool adds an option to resize image formats like JPEG, PNG, TIFF, BMP, and BMP, within the right-click context menu.
Right-click on the image file you want to resize and select the “Resize Pictures” option to open the resize picture window.

In the Resize Picture window, you will see a few default size options with custom size selections. Choose the one that fits your need and hit “Resize.” It will create a copy of the resized image. You can also choose from the original files. It supports GIF files as well.
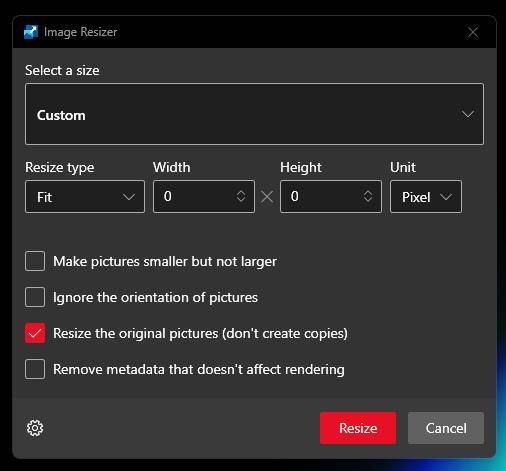
You can go to Image Resizer settings inside PowerToys, to add/remove the image sizes presets, change encoding values, and the naming scheme of the resized images.
Keyboard Manager Tool
Keyboard Manager tool is your Windows Keyboard manager that you can use to reconfigure keys and shortcuts by remapping them. It’s simple to use and works well once you are done setting it up as per your workflow.
Simply open the Keyboard Manager inside the Microsoft PowerToys and toggle on the “Enable Keyboard Manager.” Now you will see two options, Remap Keys and Remap Shortcuts.

Inside Remap Keys, you can remap a single key to another or a shortcut combo. Say, here you can remap the “C” key to the “Ctrl + C” shortcut and the “V” key to “Ctrl + V,” allowing you to do copy-pasting with a single key press.
While Remap Shortcuts will remap a shortcut to a single key or another shortcut, you can remap the shortcut to work globally or restrict it to work only on a specific application.
Mouse utilities tool
The Mouse utilities tool has a bunch of tweaks to enhance mouse or cursor functionality on your Windows computer. Currently, it only has three utilities; Find my Mouse, Mouse Highlighter, and Mouse Pointer Crosshairs.
Using Find my Mouse, you can highlight the position of your mouse cursor on the screen either by shaking your mouse or pressing the left control key twice. This particular feature can be helpful on a wide monitor or if you are using multiple monitors with your Windows computer.
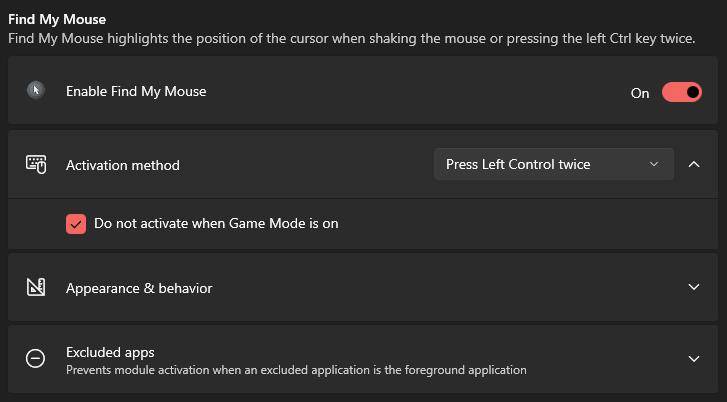
The Mouse Highlighter feature is great during screen presentations, where you can visually highlight your mouse clicks and distinguish them using different colors for both right and left clicks. Simply press the “⊞ Win + Shift + H” to quickly enable it during presentations.

Lastly, if you are still struggling to find the cursor on your screen, you can have a permanent crosshair centered on your mouse cursor using the Mouse Pointer Crosshair feature. Use the keyboard shortcut “⊞ Win + Alt + P” to enable/disable crosshair.

PowerRenamer Tool
PowerRenamer is a powerful renaming tool that resides within the Windows Shell context menu. If you are ever stuck in a situation where you need to rename files in large numbers, PowerRenamer will come in handy.
You get various options to filter while renaming files in bulk, giving you granular control during the renaming process. But even with all these features, the PowerRenamer is fairly easy to use.
To access PowerRenamer, open PowerToys, and toggle on the “Enable PowerRename.” After that select all the files you want to rename, right-click on them, and choose “PowerRename” from the context menu to open PowerRenamer windows.

Inside the window, type the word you want to change in the “Search for” field and type in the new word in the Replace with the field. Then further filter out the results using the available options and hit “Apply” button to rename all the files in just one click.

PowerToys Run tool
The Spotlight for Windows is here. If you have ever used Mac OS, you must have come across their powerful spotlight search feature that enables a mac user to open a global search bar over any app window and perform a regular file/folder search, with some advanced functions.
While there is already a default search on the Windows taskbar, which is good for nothing with its forced Bing search implementation, the PowerToys Run can be a good functional replacement for the default windows search.
First, you must enable PowerToys Run from the PowerToys (Preview) app. Once enabled, press the keyboard shortcut “Alt + Space” to activate PowerToys run the search bar on your desktop and type in your search keyword.

Currently, you can search for files, folders, applications, and settings, do simple calculations, navigate around the registry, open websites by typing in the URL, run commands, etc. There is also an option to setup autocomplete, which will enable instant search results as you type, so there is no need to press enter key every time.
You can move the PowerToys Run search bar around the screen and screen extend its size by dragging it from either side. As of now, this feature offers quite many functions, but it has the potential to become very powerful with the upcoming updates.
Quick Accent tool
Typing accented characters on a physical keyboard in a language that doesn’t have them is a task. Traditionally, you’ll need to learn the Alt code for a specific character, use the emoji keyboard, or type them using the virtual keyboard on your Windows computer.
But with the Quick Accent tool, you have to press and hold the key with the activation key to see its accented characters.

First, you will have to enable the Quick Accent tool from the PowerToys app and then set your activation key, which is either press “Spacebar” key or both “Spacebar and Left-Right Arrow” keys.
Suppose you want to type the “Ô symbol in a document; press & hold the “A” key on your keyboard and press the activation key once. A toolbar will appear with all the accented characters associated with the said key. Select the accented character by pressing the activation key multiple times and then release the main character key to type it in your document.
Screen Ruler tool
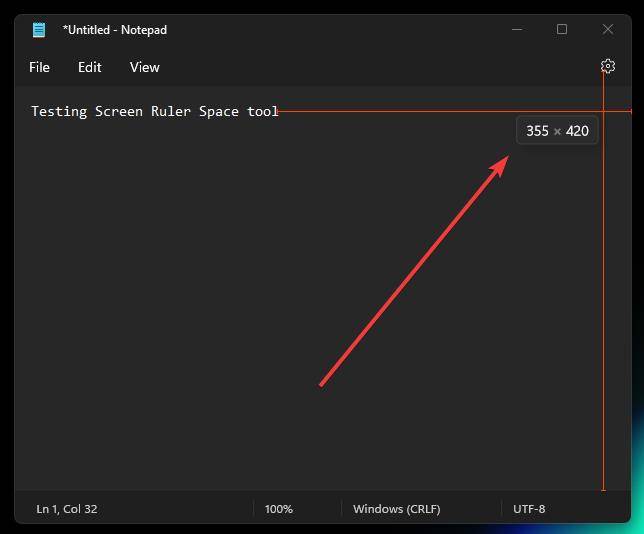
Screen Ruler is another useful utility tool for designers and website developers to quickly measure the pixels on the screen. Now with this PowerToy tool, you can easily measure the pixels inside a website or app to get its exact dimensions. You can even measure the distance between the elements, which is very useful for designers and developers.
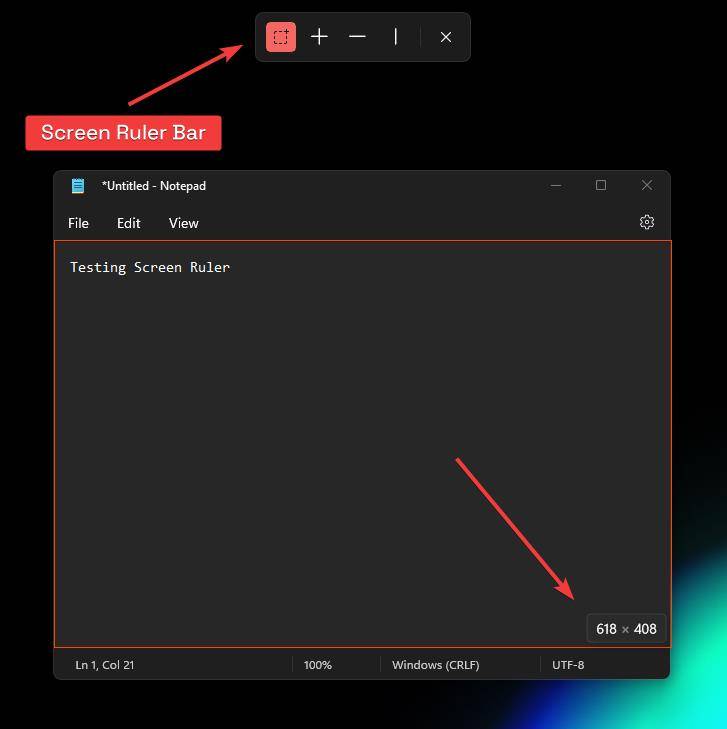
To activate Screen Ruler, enable it from the PowerToys app and press the “⊞ Win + Shift + M” keyboard shortcut to activate the Screen Ruler bar.
The Screen Ruler toolbar has four types of measurement tools. The Bounds tool can measure the pixel between the selected area. At the same time, the Space tool is for measuring the horizontal and vertical space between the two elements. Just hover over your mouse after selecting one of the space tools to instantly get pixel measurements between any element on the screen.
Shortcut Guide tool
Shortcut Guide tool is a help overlay showing all the commonly used Windows shortcuts combined with the “⊞ Win key” on your keyboard. It can be a basic guide for someone who is either bad with remembering default Windows key shortcuts or someone new to Windows 10 or 11.
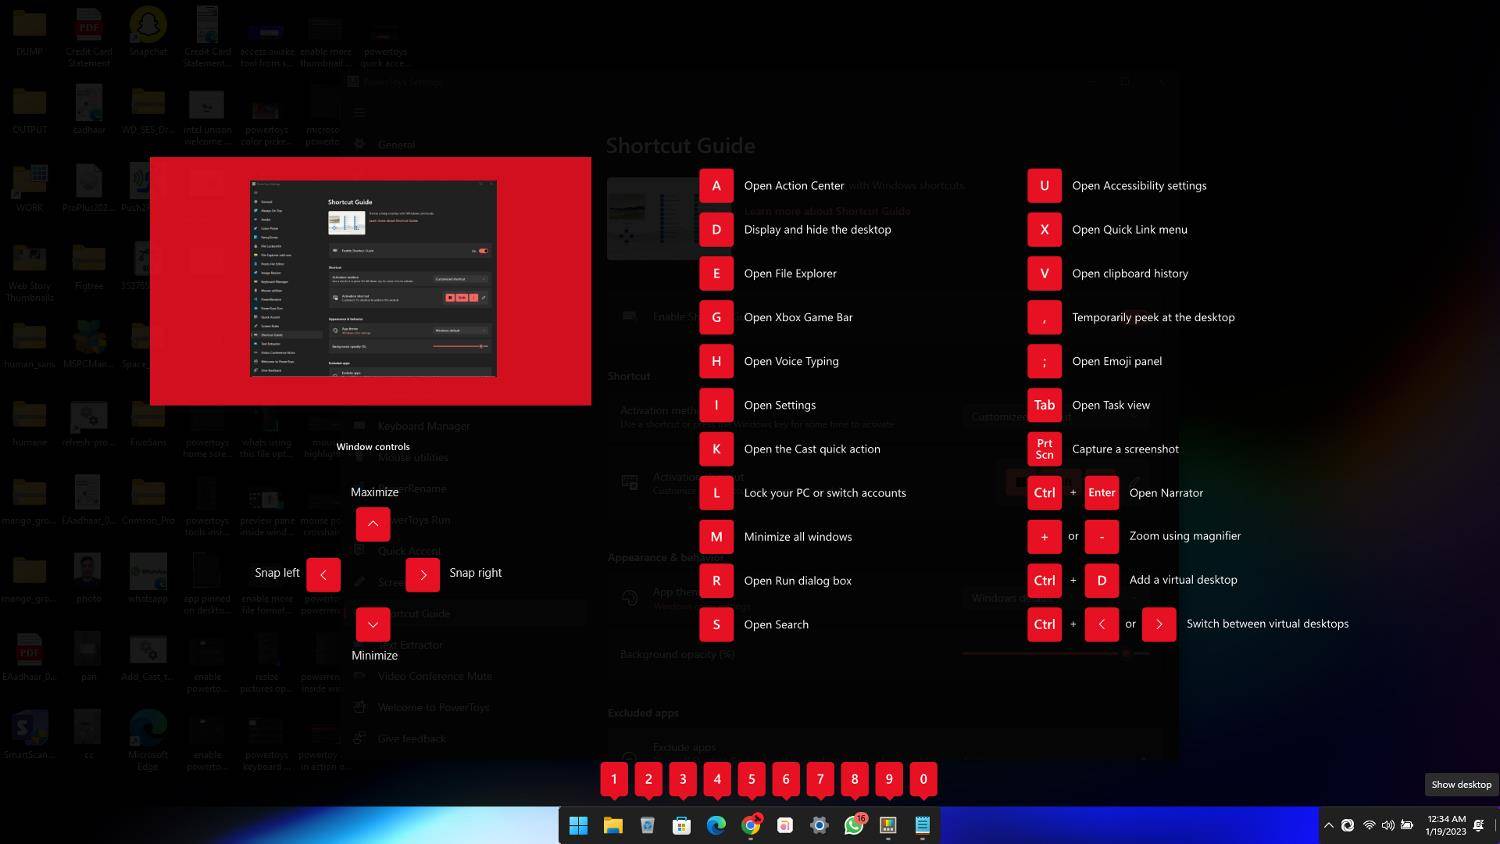
You can enable it from the Shortcut Guide settings inside the PowerToys app. After enabling, press and hold the “⊞ Win” key for 1 second to see the shortcut overlay and then release it to hide. (1000ms or 1s is the default duration, which you can increase or decrease within PowerToys settings)
You can choose a different activation shortcut if the default shortcut conflicts with other apps like Microsoft Edge.
Text Extractor tool
Text Extractor Tool is another gem from the PowerToys collection. It is an OCR (Optical Character Recognition) tool that can recognize and extract text from any image, PDF, or video on your computer.
Note that you might need to install the OCR pack for the language you want to extract text for. Microsoft has a guide on how to install an OCR pack for supported languages on their blog.
Once you have enabled the Text Extractor tool from PowerToys settings, open the image or PDf from which you want to extract text and press the “⊞ Win + Shift + T” keyboard shortcut to activate the tool.

Your computer screen will darken. Now you need to click & drag your mouse cursor over the text you want to extract and release it. Your text will automatically be saved inside your Windows clipboard, which you can paste anywhere you want by pressing the “Ctrl + V” keyboard shortcut.
Video Conference Mute
While Windows 11 already has a dedicated mute keyboard shortcut, you can mute or unmute your computer’s microphone using the “⊞ Win + Alt +K” shortcut. It is only limited to a handful of apps, like Microsoft Teams or Skype.
The Video Conference Mute tool works globally and allows you to mute/unmute your microphone and webcam.

Once you enable this tool from the PowerToys app, you can either mute/unmute both and individually by pressing the assigned keyboard shortcuts. By default, pressing “⊞ Win + Shift + Q” will mute/unmute both the camera and microphone.
On the other hand, pressing “⊞ Win + Shift + A” will only affect your microphone, and “⊞ Win + Shift + O” is for the camera.
If you are using multiple input sources for your mics, you can mute/unmute all or just one. Video Conference Mute tool also lets you add a preview image for muting your webcam using this tool.

Wrapping Up: Microsoft’s PowerToys – The Swiss Army Knife Tool for Windows 10
Microsoft’s PowerToys is a powerful and versatile tool for Windows 10 & 11 users. It offers many features that can help you customize your Windows experience and automate many common and tedious tasks. The PowerToys package contains all the tools mentioned above, and you can enable, disable or customize any of these tools in PowerToys settings.
So far, the tools are mostly limited to your desktop and the basic functionalities. Still, with the upcoming updates, PowerToys is expected to become even more powerful and offer features that could easily replace third-party tools. And I am being honest here; I am already using all the utilities of PowerToys to make my Windows experience efficient.
So, if you are Windows 10 or 11 user, PowerToys is a must-have. Its built-in tools can save you a ton of time and make your Windows experience better and smoother in many ways.